API Tests
Flask
To conduct unit or integration tests in pytest, we can use Flask's test_client() method and call it as a fixture.
import sys

import pytest

sys.path.append("project")
import app


@pytest.fixture(scope="session")
def client():
    app_ = app.app.test_client()
    yield app_


def test_health_check(client):
    """status check"""
    response = client.get('/')
    assert response.status_code == 200
    assert response.json == {"status": "ok"}
There are often functions within the request route, which we will need to mock. To do that, we can use the following.
# project/server.py
from flask import Flask, request
from inference import predict

app = Flask(__name__)


@app.route("/predict", methods=["POST"])
def predict():
    content = request.json
    input_sku_list = content["sku"]
    x = predict(input_sku_list)
    return {"results": x}

if __name__ == "__main__":
    app.run()
# tests/unit_tests/api_test.py
import sys
from unittest.mock import patch

sys.path.append("project")
import app

@patch("server.predict", return_value=2)
def test_api(predict):
    with app.app.test_client() as client:
        response = client.post('/predict', json={"sku": "abc"}).json
    assert response=={"sku": 2}
Gunicorn
We can also have a smoke test to ensure that gunicorn can be spun up successfully.
import os
import json
import time

import requests


url = "http://localhost:5001/ocr"
wait = 10
cmd = "gunicorn -c config/gunicorn.conf.py app:app --workers=1 --daemon"
sample_request = {"something": "something"}
sample_response = {"somethingelse": "somethingelse"}

def test_gunicorn():
    os.system(f"cd project; {cmd}")
    time.sleep(wait)
    response = requests.post(url, json=sample_request)
    response = json.loads(response.content)
    assert response == sample_response
    os.system("pkill gunicorn")
Pytest Docker API
We can use pytest-docker plugin to do automated integrated tests for containerised APIs within pytest. What it does is to launch the container using docker-compose, and apply as a fixture so that all tests can have access to the container(s). It then shuts down the container(s) automatically after all tests are completed.
The integration test code below generates a dummy docker-compose-test.yml, so do include this in .gitignore
Note that we will have to add a dummy GET request to the root endpoint, where pytest-docker will ping at this line docker_services.wait_until_responsive.
Test Code
import os
import json

import pytest
import requests
import yaml

from requests.exceptions import ConnectionError


# ----------------
# Global Variables

service_name = "model-prediction"
container_port = 5000
endpoint = "prediction"
docker_compose_name = "docker-compose-api.yml"
dockerfile_name = "Dockerfile-api"
model_source_path = os.environ["SOURCE_MOUNT"]
MODEL_FILE = "model.pkl"
request = \
{
    "your_request": "xxxx"
}


# -----------------
# Utility Functions

def gen_docker_compose_test():
    """change docker-compose.yml for testing"""
    with open(docker_compose_name) as f:
        list_doc = yaml.safe_load(f)

    # delete image url
    del list_doc["services"][service_name]["image"]
    # add build folder & dockerfile name
    list_doc["services"][service_name]["build"] = \
        {"context": "project/", "dockerfile": dockerfile_name}
    # edit model source path folder
    list_doc["services"][service_name]["volumes"][0]["source"] = \
        model_source_path
    # change model name in env
    list_doc["services"][service_name]["environment"] = \
        ['WORKERS=max', f'MODEL_NAME={MODEL_FILE}']

    with open("docker-compose-test.yml", "w") as f:
        yaml.dump(list_doc, f)


def is_responsive(url):
    try:
        response = requests.get(url)
        if response.status_code == 200:
            return True
    except ConnectionError:
        return False


# -------------------------------------
# Setup Fixtures to Launch Container(s)

@pytest.fixture(scope="session")
def docker_compose_file(pytestconfig):
    """set docker-compose*.yml file path"""
    gen_docker_compose_test()
    compose_filepath = os.path.join(str(pytestconfig.rootdir), "docker-compose-test.yml")
    return compose_filepath


@pytest.fixture(scope="session")
def http_service(docker_ip, docker_services):
    """ensure HTTP service is up and responsive"""
    host_port = docker_services.port_for(service_name, container_port)
    url = f"http://{docker_ip}:{host_port}"
    docker_services.wait_until_responsive(
        timeout=60.0, pause=0.1, check=lambda: is_responsive(url)
    )
    return url


@pytest.fixture(scope="session")
def docker_cleanup():
    """remove images & containers, default only 'down -v'"""
    return "down -v --rmi all"


# -------------------------------
# Integration Test Cases

def test_sample_request(http_service):
    """test sample request and returns more than 1 sku"""
    # http_service refers to previous fixture, returning the url
    url = f"{http_service}/{endpoint}"
    response = requests.post(url, json=request)
    content = json.loads(response.content)
    sku_count = len(content["sku"])
    assert sku_count > 0
Another way to do the same thing without using the plugin is as follows.
def docker_get_logs(service_nm):
    import subprocess
    logs = subprocess.check_output(f"docker logs {service_nm}", shell=True)
    return logs
CI Pipeline
Below is an example Gitlab-CI job to run this integration test.
There are various points to note:
- base image to use the stated which have all the essential libraries bundled.
- If we are mounting a file/model to the API, we need to use the SOURCE_MOUNT path indicated so that docker-in-docker service can access it
- If we are using tox, in tox.ini, we need to enable access to env variables from host os to access the SOURCE_MOUNT variable using this command
passenv = *
integration-tests:
  stage: test
  timeout: 10m
  image: sassy19a/dockercompose-py3-awscli2
  services:
    - docker:dind
  variables:
    SOURCE_MOUNT: "/builds/shared/$CI_PROJECT_PATH"
  before_script:
    - pip3 install tox
    # download model file for mounting
    - aws s3 cp "${S3_MODEL_DIRECTORY}/association/rules.pkl" $SOURCE_MOUNT/rules.pkl
  script:
    - tox -e integration
  artifacts:
    when: always
    reports:
      junit: report.xml
  rules:
    - if: '$CI_PIPELINE_SOURCE == "merge_request_event"'
      changes:
        - project/*.py
        - project/Dockerfile-api
Postman
Postman allows us to write unit-test cases easily. This is done by creating a folder called collections from the left panel, and inside it, we can create individual requests, with a proper unit-test name for them.

For each request, under the test tab, we need to define the condition to pass each test. There are some helper scripts on the right panel to assist you.
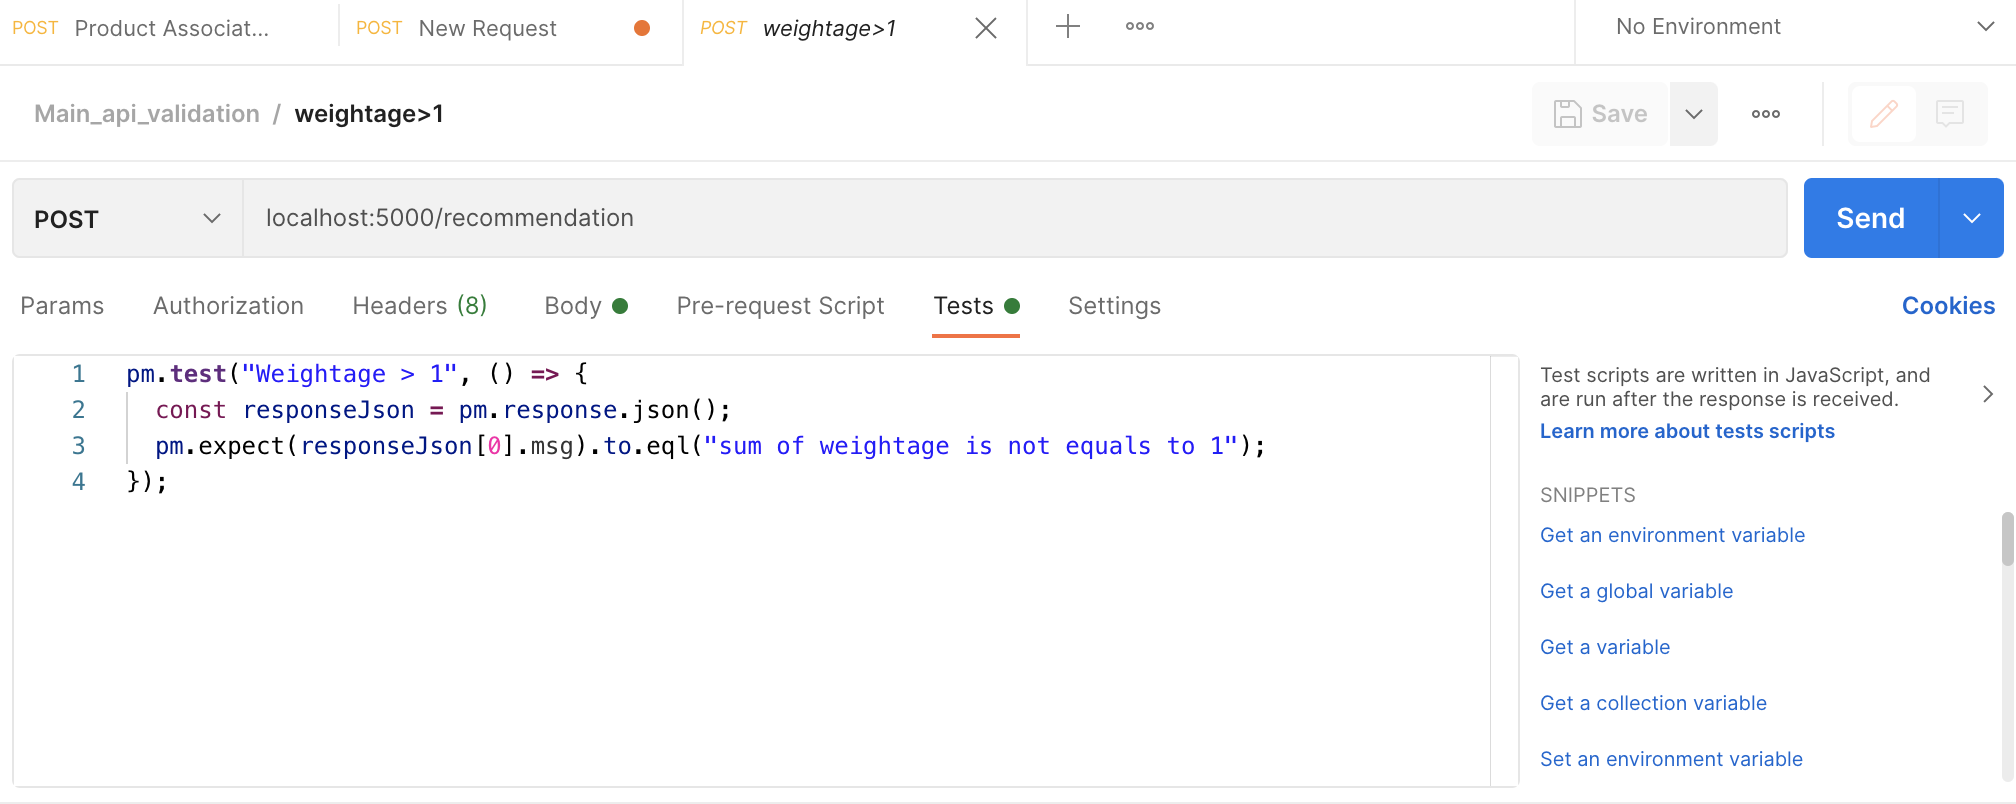
For the collection, we can define variables which we can call in our tests with a double curly brackets {{variable_name}}. To run all the tests in the collection, click on your collection folder, and click Run at the top right corner.

We can export the entire unit-tests script as a file json, and pass it to someone.
Newman
With the collections in json format, we can run that script in the commandline in our CI/CD pipeline, requiring installing npm & then newman, npm install newman. See more from Postman's website.
Memory Leak
Memory leak is an insidious fault in the code that can consume the entire memory (RAM or GPU) over time & crash the application, together with other applications in the same server. To detect this, we usually need to run multiple requests over a period of time to the API to see if the memory builds up. We can use an app I developed to do this; memoryleak-checker.

Load Test
Load testing is the process of determination of behavior of system when multiple users access it at the same time.
Locust is a popular open source load testing library developed in python. We install it using pip install locust. And write the following script, saving it as locustfile.py.
from locust import HttpUser, task, between
import json


with open('test_data/sample_request.json') as f:
    request = json.loads(f.read())

class APIUser(HttpUser):
    host = 'http://localhost:5000'
    wait_time = between(3, 5)

    @task()
    def predict_endpoint(self):
        apikey = "yourapikey"
        self.client.post(
          '/predict',
          headers={"x-api-key": apikey}
          json=request
        )
Another example using different requests.
from locust import HttpUser, task, between

import base64


host = "https://something/api"
mode = ["keyvalue", "barcode"]
image_path1 = "image_002.jpg"
image_path2 = "image_000.jpg"
image_path3 = "image_001.jpg"


def to_base64(image_path):
    """convert image to json request input"""
    image = open(image_path, 'rb')
    base64_encoded = base64.b64encode(image.read()).decode("utf-8")
    return base64_encoded


request1 = {
    "requestImage": to_base64(image_path1),
    "mode": mode
}
request2 = {
    "requestImage": to_base64(image_path2),
    "mode": mode
}
request3 = {
    "requestImage": to_base64(image_path3),
    "mode": mode
}


class APIUser(HttpUser):
    wait_time = between(3, 5)
    @task()
    def predict_endpoint(self):
        response = self.client.post('/api', json=request1)
        response = self.client.post('/api', json=request2)
        response = self.client.post('/api', json=request3)
We then launch it in the terminal using the command locust, and then the GUI can be access from localhost:8089.
We can test the total number of users as 10, with a spawn rate of 1. This means that the API will be launched with only 1 user requesting, and after every 3-5 seconds (the wait_time), another new user will be added, until the total of 10 users are reached.
During the process of running, we can also change the number of users.

Going to the statistics, a summary of the total users, failures and request per seconds

We can also have a visual representation in line charts.

For an overall report, with a more detailed statistics and response percentile levels with charts all within a single page, go to Download Data > Download Report to download a html version of the report.

Other commands are as follows:
locust -f locust_files/my_locust_file.py --headless -u 1000 -r 100 -run-time 1h30m
| CMD | Desc |
|---|---|
-f |
specify file name & location if they are diff from default |
--headless |
only print in console, with no GUI |
-u |
no. users to spawn |
-r |
spawn rate; no users to add per second |
-run-time |
time limit for test |